BackCountry Cuisine

How to make great tasting, lightweight food in the backcountry.

  • BackCountry Cuisine
  • BackCountry Cuisine Youtube channel
  • Dustin Dawson Photography
  • Blog
  • Sources of Dried Food
    • Online Sources of Dried Food
    • Eugene Springfield Area Sources of Dried Food
  • Backcountry Baking
  • Recipes, Recipes, Recipes
    • Breakfasts
    • Lunch
    • Dinners
    • The Pantry Method
    • Sauces
    • Baking Recipes
  • Gear Corner
    • Stoves
    • Pots and Pans
    • The Pot Cozy
    • Dehydrators
    • Ultralight Equipment List
  • Book Shelf

Peanut Butter Chocolate Lava Cake with the Bobcat Stove system

October 4, 2015 by Dustin Dawson Leave a Comment

DDPhoto-1
It was pretty incredible. We hiked 10 miles up into the three sisters wilderness, set up camp, swam in Husband lake, then made a great meal of Tuna casserole. Did it stop there? No way! Using my ultralight baking setup I cooked up a chocolate cake to have at sunset! Ultralight backpacking has never been better.  You heard me right, baking and ultralight in the same sentence!

I have been baking in the backcountry for over 20 years, but I stopped a few years ago because I went ultralight.  The extra 3 pounds were just not going to fly in the ultralight pack!  Now, Jon over at Flat Cat gear has created a system that works so well, and is so light, I can’t imagine not baking on every trip. My baking kit weighs only 4.6 oz. for my 2-3 person baking setup, or only 2.9 oz for my solo kit.

2015-10-04 15.25.23
2-3 person kit:
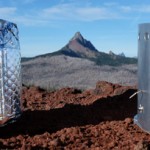
3.6 oz Fat Daddio 5in x 2in pan with rim cut off
0.5 oz Flat Cat gear Epicurean Stove (esbit stove)
0.5 oz Felt hat for top of cook pot

You can get this whole kit from Jon for $50. For that price he trims the rim off the pan for you. It is a pain to do it, and he only charges $7.50 for it.

2015-10-04 15.26.21
Solo kit:
2.2 oz Fat Daddio 3 in x 3 in pan with rim cut off
0.5 oz Flat Cat Gear Epicurean Stove (esbit stove)
0.2 oz Felt hat for top of pot

The solo kit is a little cheaper at around $40 from Jon at Flat Cat Gear.

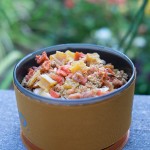
For the simplest of “lava cakes” you can get packaged brownie mix or chocolate cake mix. The recipe below is a gluten free recipe that I came up with.

1/4 cup flour (Bob’s Red Mill gluten free baking mix)
1/2 cup sugar
1/4 cup butter powder
5 Tbls cocoa powder
1/4 cup peanut butter powder
2 Tbls powdered egg
1/2 tsp salt

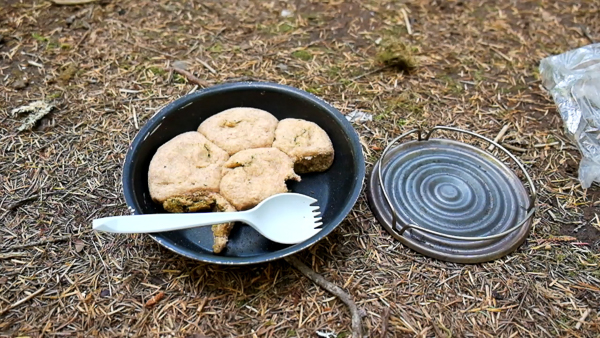
Add all ingredients into a bowl and mix well. Try to break up the clumps of the different powdered ingredients.  I put them through a mesh strainer and that works really well.  To fit the 5″x2″ pan use all of the powdered mix.  For the smaller pot only use 3/4 cup of powder.

In camp use just enough water to barely make it flow.  I put parchment paper at the bottom of the pot to make it much easier to remove.  The paper does not register on my 0.1 g accuracy stove, so that is pretty light and well worth it.  Just be sure to pack out the paper!

I hope you enjoy the baked goods in the backcountry!  Eat well!

Dustin


Filed Under: Uncategorized Tagged With: Backpacking, baking, brownie, carbon felt, chocolate, cooking, hiking, lava cake, peanut butter, recipe, ultralight

Enchiladas on the trail? Bring it!

July 25, 2015 by Dustin Dawson Leave a Comment

Meal:  Rice and Beef Enchiladas
 

Dinner with a view
I came up with this recipe a few months back when I had some left over tortilla chips. It tastes surprisingly like enchiladas even though you don’t bake it.  It is not a hard recipe to make and there are endless combinations. Here is the recipe I used (all measures are per person):

1/2 cup rice
1/4 cup dried mixed vegetables
1/4 cup beefish bits (from Harmony House Foods)
1/4 cup dried enchilada sauce(recipe)
1/2 cup tortilla chips (broken is fine, but you want chip pieces, not the powder at the bottom of the bag) Package these separately.
1 – 1.5 cups water
Add water and all ingredients except chips to your pot and heat to a boil.  Turn off stove and add the tortillas and mix.  Put the pot in the cozy and let sit for another 10 minutes.  Enjoy!  The more water you add the more saucy it will be. 1 cup water will make it pretty thick.  I prefer it more saucy myself.
Variations:  Use dried or foil pouch chicken in place of the beefish bits. Use dried beans instead of the vegetables.  Doritos add even more flavor then regular corn chips. Use less rice and more beefish bits.  Want a Kick?  Put in a teaspoon of dried jalapeños.
Eat well!
Dustin

Filed Under: Uncategorized Tagged With: alcohol, Backpacking, cooking, dehydrated, enchiladas, hiking, recipe, sauces, ultralight

Tuna Casserole at Hart Lake

July 8, 2015 by Dustin Dawson Leave a Comment

Meal:  Tuna Casserole

Tuna Casserole with cheese powder
After a long day of hiking nothing is better then jumping into a cool alpine lake. My wife and I swam for almost an hour before we decided that it was time to make some dinner. As we rummaged through the bear canister, we found our packet of tuna casserole. Perfect, for such a great long day. Filling and tastes amazing. Very creamy in texture thanks to the cream of mushroom soup mix that I put in. I use rice, but you could also use egg noodles. The egg noodles are more bulky and we only had so much room in our bear canister. Add some peas and some dried tuna and you are ready to go! Here is the recipe(all measures are per person):

1/2 cup dried or instant rice
1/4 cup dried tuna
1/4 cup dried peas
1/4 cup powdered cream of mushroom soup mix
1/4 cup cheddar cheese powder(optional)

You can use more soup mix to make it more creamy. By the way, the soup mix is great as a winter lunch too!  It was an amazing meal, if you don’t have a dehydrator, then you can use foil pouch tuna, but it adds weight.

Tips and Tricks

The peas can take a longer time to rehydrate then other vegetables.  I have been using a simmer ring on my alcohol stove lately to increase the heated time, but you could just as easy keep your meal in the cozy for longer too, if you are patient enough.

Gear Corner

We needed a bear canister for our trip into the Olympic National Park and instead of renting one, I  decided to look for light weight options. The Lighter1 cam out on top for us. Not only was it the lightest bear canister I could find that was certified for use in Yosemite, but it also uses a metal lid that can double as a cooking pot. It is a great system and it worked perfectly for us. If you are in the market, check it out!

Filed Under: Uncategorized Tagged With: alcohol, Backpacking, bear canister, casserole, cream, dehydrated, hiking, mushroom, peas, pot cozy, recipe, rice, sauces, tuna, ultralight

Curry chicken and rice with broccoli

January 3, 2015 by Dustin Dawson Leave a Comment

Meal of the week:  Curry Chicken and Rice with Broccoli

Want curry in the backcountry?  No problem!  I will even show you how to make your own curry powder that tastes great.  It is really simple.  Add all the following ingredients into a bowl and mix well.  A whisk or morter and pestle is best as it really mixes the spices well, but I have used a spoon before and it works fine.

1/2 tsp chili powder
2 tbls cumin
1 tbls coriander
1 tsp onion powder
1/2 tsp garlic powder
1 tbls turmeric
1 tsp salt
1/2 tsp sugar
This is your bulk curry powder.  Store this in a small container or ziplock for quick use when prepping meals.
Here is the meal I made in my youtube video, but remember that you can substitute any veggies or protein that you want.

Curry Chicken and rice with broccoli (Serves 1)
1 Tbls Curry powder(use store bought or above recipe)
3 Tbls Milk powder(coconut powder is the best, but whole milk powder is great too.  Nido is the brand of whole milk I like.)
1/2 cup instant rice
1/4 cup dehydrated veggies(from Harmony House)
1/4 cup Chickenish Bits(Flavored TVP from Harmony House)
Optional additions:
More chili powder (for more heat)
1 Tbls dried jalapeños
2 Tbls dried currents or rasins(I like currents better).
Without any additional items, this will take about 1.5-2 cups of water, depending on how saucy you want it.  I like mine with a bit more sauce and it helps to keep it from sticking to the bottom when you cook it.
I hope you enjoy and please leave a comment if you have questions or other ideas.

Gear Corner

One great way to reduce your fuel usage and keep food from burning on the bottom of your pot is to use a pot cozy.  A pot cozy is an insulated cover for your pot or zip lock freezer bag.  I make them out of Reflectix (foil covered bubble wrap).  You can find it at your local hardware store.  You can also use the reflective windshield screens that are usually used on hot summer days.  In the video below you can see how I make my double walled version.  It keeps food incredibly hot.  I have had food in the cozy for 30 minutes and it is still too hot to eat!  As you eat, you leave the bottom cozy part on and it keeps the food warm.

Tips and Tricks

Great breakfast trick.  Instead of making breakfast in camp, you can add the water to your zip lock bag and start hiking.  After an hour or so of hiking you can stop and cook up your meal. It cooks much faster and uses less fuel.


Enjoy! Dustin

Filed Under: Uncategorized Tagged With: alcohol, Backpacking, broccoli, chicken, cooking, curry, dehydrated, hiking, pot cozy, recipe, rice, sauces, stove, ultralight

Flat Cat Stove in the snow? No problem!

November 16, 2014 by Dustin Dawson 1 Comment

Meal of the week:  Cream of Mushroom Soup

Dry Cream of Mushroom Soup
A great trick for adding some flavor and/or variety into your backpacking meals is to use pre-packaged sauces and seasoning packets.  Lipton has a huge selection of soups and sauces, Annie’s foods have a lot as well.  It is a very quick way to make some really great meals.  The problem is you are stuck with what the company comes up with, and what they put in it.  MSG or a truckload of salt are pretty common in these sauces.  I’m not a big fan of either.  I ran across a great site called trailfood.com.  It has a lot of great food ideas for the backpacker.   What got me most excited about the site is that it has a section devoted to dry mixes and sauces!  This is exactly what I wanted.  She has come up with recipes for your own broth powder, cream of mushroom soup, Salsa, cheese sauce, pesto and a few others.  
Finished Cream of Mushroom Soup
So this weekend, I tried out the parmesan cheese sauce over rice with potatoes and broccoli.  It tasted great!   Here is the recipe I used: Cheese sauce: 1 cup dry milk (whole milk powder like “Nido” is the best” 1 1/2 tsp dried garlic powder 1/2 tsp onion powder 1/4 cup shelf stable parmesan Mix all these ingredients together well. For one person combine: 1/2 cup instant rice 1/4 cup dried potatoes 1/4 cup dried broccoli 3 Tbls cheese sauce powder 1 cup of water plus a little more depending on how saucy you want it. If you like making your own food and having complete control over what you put into your body.  Check this out!

Gear Corner

Flat Cat Stove System
About a month ago I purchased yet another stove.   I know that I have a problem but I just can’t help myself.   This stove is by Jon at Flat Cat Gear and is the best alcohol stove I have ever used.  First off, the Flat Cat stove is not a pressurized stove, so there is no prime time.  You pour the alcohol in, you light the stove and put the pot over it.  Done.   It is much more similar to a canister stove in that way.  Second, the stove can be used with any windscreen, but Jon has a windscreen/pot support system that is heavy duty and lightweight at the same time.  It folds down small and will fit in small diameter pots.  My lightest system so far uses a simmer cat stove and a piece of hardware cloth as a pot support(10.2 oz).  The Flat Cat stove system is 11.8 with simmer ring and 11.2 without, but with all the advantages, I like it way better.  It is worth the extra oz.  In addition, you save that amount of weight in fuel alone if you are going on a two night trip.  The simmer cat works great, but you can not put out the stove once lit.  You have to wait for it to burn out of fuel.  With the Flat Cat, you can place your pot right on top of the stove and it goes out quickly.  
stove and simmer ring
You can also pour that fuel right back into your fuel bottle easily as there are not any side ports.  The stove was also much more efficient then I expected.  I can almost boil 1 cup of water with 1/4 oz of fuel.  I can’t explain it, but what worked better was to put in 1/2 oz fuel for 1 cup water, bring it to a boil and then snuff out the stove so I could reclaim the remaining fuel.  It used just over 1/4 oz in that way.  If I only put in 1/4 oz, the water only got to about 170.  Still plenty hot for a cup of coffee or tea, but not boiling for meals.  Lastly, he also sells a simmer ring for the stove that has allowed me to bake for 45 minutes using only 1 oz of fuel!  It is really amazing.  I bought the Bobcat system as I always go out with my family of three, and I need the larger volume pot (1.6 L Toaks titanium pot).  Jon also sells some smaller systems for solo hikers.

Tips and Tricks

What about using an alcohol stove in the snow?  Alcohol stoves don’t work well in cold temperatures right?  In general that is true.  You don’t have a pressurized container pushing the fuel through the system.  You need the heat of the stove to do the work.  In addition, alcohol stoves do not burn as hot in general, and are influenced by the outside temperature a lot.  I was surprised to find out the Flat Cat stove, had very little issue with the cold.  All that was required was to put some kind of insulation between the snow and the stove.  I put a piece of carbon felt on the snow, then put my heat shield on top of that, then my stove.   Carbon felt(you can buy this on amazon, or at any local hardware store that sells plumbing supplies) is a high temperature material that plumbers use when working with copper in a house.  The flame can touch the felt, but it will not burn.  Great stuff for stoves.  The carbon felt did the trick and the stove stayed hot during the burn and the water boiled without any issues.   It was just as hot as during the summer.  This was my first test out in the snow, but the temperature had dropped to 11 degrees Ferinheight overnight, so it was plenty cold to test the low temperature abilities of this stove. No excuses now, you can use your alcohol stove in the snow, so get out there and enjoy some great meals during those winter treks.  I am particularly looking forward to some hot cream of mushroom soup when I go out on my cross country skiing trips!  Enjoy! Dustin

Filed Under: Uncategorized Tagged With: alcohol, Backpacking, carbon felt, cooking, cream, dehydrated, hiking, mushroom, recipe, sauces, snow, stove, ultralight

Smoky Scott mountain with sweet potatoes.

August 6, 2014 by Dustin Dawson Leave a Comment

Backcountry-Kitchen-3

Meal of the week:  Inca Stew

The view from the top of Scott mountain was pretty smoky due to the fires in Ashland, but that did not effect the flavor of our wonderful Inca Stew!  Once again, my cooking guru Chef Glenn has posted a new recipe that is outstanding.  Find the recipe here!

Backcountry-Kitchen-2
My wife and I ate this meal at our campsite near Tenas lakes.  I was surprised how well the sweet potatoes rehydrated.  They tasted great and added a sweetness that really worked well with the quinoa.  I always season my quinoa well with broth when I cook it.  I added some additional flavored TVP from Harmony House to give more protein to the meal.  Great meal!

I also did some research on sweet potatoes.  I have never really understood the difference between sweet potatoes and yams.  In the US, yams you buy at the super market are really orange sweet potatoes.  The white and orange sweet potatoes are really just two different varieties.  True yams are from Africa and Asia.  They are only found in asian markets in the US.  So for this recipe, the orange “yams” you find at the store are really sweet potatoes so go ahead and use them.  I personally prefer the orange.  I think the white is a bit more starchy.

Gear Corner

Backcountry-Kitchen
There are many ways to carry your alcohol stove fuel.   The simplest method is to use a lightweight water bottle.  I have issues with this for several reasons.  First, it is a water bottle and the liquid is clear like water.  Too easy for me to make a sleepy mistake early in the morning light.  People who have more wits about them can find ways to label the bottle so that this mistake does not happen.  Second, I am worried about that thin bottle getting a hole in it.  It can be a pain if your water bottle gets a leak in your pack, but it can be a serious danger if your fuel bottle starts to leak in your pack.  I always carry my fuel bottle in a ziplock bag just for this reason, but I also use a cool bottle I found at brasslite stoves.   It is an 8 oz (they also make a 16 oz version) bottle that is thicker plastic but still very light weight.  What I really like about the bottle is that it has embossed markings for the fuel, and it has a built in measure right in the bottle!  This makes it super easy to draw out 1/2 ounce or even a 1/4 ounce if you just need to heat something up.  I have been using it for a couple of months now and I really love it. 6 oz of alcohol has been perfect for a three day two night trip.  If you drink a lot of coffee or cocoa on your trips you might want closer to 8 oz.  Check it out here at the brasslite stove site.

Tips and Tricks

This is an add-on to one of my earlier tricks for you alcohol stove users.  I mentioned before that to save knuckle hair when lighting your stove, you can light a stick then use the stick to light the stove.  This works great when you have really thin dry material.  However, I had a few trips where either the wood was really wet, or I had nothing thin enough to light easily with the lighter.  The easy fix is to dip the stick in your alcohol first.  Now you are lighting the small amount of fuel on the stick and it lights really easy.  It does not burn hot or stay lit for long, so there is no fire danger unless you throw the lit stick into the dry grass (don’t do that!).

Enjoy your next trip and don’t forget to eat well!

Dustin


Filed Under: Uncategorized Tagged With: alcohol, Backpacking, cooking, dehydrated, fuel, hiking, measuring, recipe, stew, stove, sweet potatoes, ultralight

Baking with Tea lights – Fail!

June 8, 2014 by Dustin Dawson Leave a Comment

Backcountry-Kitchen-4

Meal of the Week:  Pesto Knots

Basic Yeast Dough
1/2 package active dry yeast
1/2 cup warm water
1/4 tsp salt
1/2 tsp sugar
1 tsp olive oil
1 1/2 cups flour

Backcountry-Kitchen
When you are about 30 minutes from your campsite, take a break on the trail and mix up your dough.  Add the water to the yeast and sugar in a zip lock bag and let sit for about 5 minutes.  Ideally, you have a sunny rock you can put the starter on to warm up.  After the five minutes you should notice some foam in the bag.  That is the yeast getting going.  Add the flour into the ziplock bag and kneed carefully so you don’t break the bag.  Once the dough has started to form and it is pulling away from the bag, take the dough out of the ziplock and kneed a little longer in your hands or on another larger plastic bag.  Once it seems that all the flour has been well combined, put it back into the ziplock bag and throw it in your pack for the remainder of the hike.

Backcountry-Kitchen-3
Once back in camp, you can take out your dough, and divide the dough into about 6 pieces.  Each piece should be flattened into a small round pancake about 3-4 inches in diameter.  Put about a teaspoon of pesto in the middle and wrap it up, pinching the dough together to make a ball.  
Backcountry-Kitchen-2
Place all 6 pesto knots in the pan and set up your oven.  If you are patient, it is best to let the knots rise for 20 more minutes before baking.  I am usually not patient, and they still turn out great, though a little more dense.  Bake for about 30 minutes.  You should start to smell the bread baking after about 20 minutes.   If you have left over pesto, I spread a little on top of the hot knots.  Enjoy!

Backcountry-Kitchen-5

Gear Corner

Backcountry-Kitchen-6
I have been baking for years in the back country.  By far the best baking system I have ever used is called the Outback Oven by Backpackers Pantry.   While it certainly does not fit in to the Ultralight system(9.5oz in addition to the rest of your pot and stove kit), it is very light weight and works very well.  I am currently working on a lighter version of the Outback Oven

Backing with three tea light candles, just did not work.  It got hot enough to create a great environment to rise the dough, but not hot enough to bake.  I switched over to a tea light alcohol stove with only 1/4 oz of alcohol.  I burned that off, then let the whole set up sit for 5 minutes to keep baking.  Then I pulled everything apart and put another 1/4 oz of fuel in the stove and cooked again.  In the end it did work, but the stove still got too hot and started burning the “oven” a bit.  I have some modifications in mind to try and make this system work, so I will report back in a few weeks and let you know what progress I made.

Tip of the Week

Often you want small ziplock bags for yeast or sugar or spices.  To make small ziplock bags at home, take a snack size ziplock and cut it in half.  I use packing tape to seal up the cut end and now I have a small ziplock!

Enjoy your time out on the trail!

Dustin

Filed Under: Uncategorized Tagged With: Backpacking, baking, cooking, hiking, pesto, recipe, stove

World peas, a new stove and some lost knuckle hair!

June 1, 2014 by Dustin Dawson Leave a Comment

We may be creating World peas, but if your not careful, you may lose some knuckle hair in the process!  I certainly did this week when lighting my new alcohol stove.  Those mini bic lighters get you close to the action!

I made a youtube video showing how the new stove system works.

Meal of the Week

untitled-53-2
The featured meal of the week is World Peas with Chicken TVP (textured vegetable protein) and veggies.  This meal comes from “Recipies for Adventure” by Glenn Mcallister.   I added medium salsa to the recipe, so it had a great bite to it.  The recipe is really simple.  You blend peas, salsa, spices, bouillon and water until creamy, then dehydrate until it is completely dry.  See Glenn’s website for more information about making bark.   Then you add whatever type of protein and some veggies and you are ready to go!  It rehydrated very easily and tasted fantastic.  Give it a try!  I get all my TVP from Harmony House Foods.  

In the Gear Corner

untitled-5
I have been playing around a lot this weekend with different alcohol stove set ups.  The tea light stove is crazy simple, but in order to boil 3 cups of water, I would have to refill it in the middle of cooking.  It also takes a long time to get that little stove to boil the water.  I made a Super Cat stove from a fancy feast can in the past, but that was way too hot for my little compact system.  I decided to try the slower cooking Simmer Cat design with only one row of holes and it worked perfect!  It takes about 9 minutes to boil 3 cups of water.  This gives the food a long slow cook time.  The stove only weighs 0.25 oz.  Twice that of the tea light stove, but still so light that you barely notice the thing.  The whole stove system with pot support, reflector, stove, windscreen and cozy weighs in at only 3.3 oz!  If I add my pot and ultralight lid I get up to 9oz.  Not bad at all for 2 people cooking dinner.  You still need to add fuel of course, but that will depend on how long you are out for.  It burned really well for my meal this week and was super easy to use.

Tips and Tricks

For my tip and trick this week I am going to save some of the knuckle hair you love so dearly.  When lighting an alcohol stove with a small lighter, you end up putting your hand right over the stove.  To keep your hand at a distance, use your lighter to light an eight inch long stick that is 1/16 inch in diameter and use that to light your stove.  We all know how attractive that knuckle hair is, so be careful!

Have a great week everyone and remember to keep cook’n!

Dustin

Filed Under: Uncategorized Tagged With: alcohol, Backpacking, cooking, dehydrated, hiking, peas, recipe, stove, ultralight

Subscribe to our Newsletter

Tags

alcohol Backpacking baking bear canister bread broccoli brownie carbon felt casserole cheese chicken chocolate cooking cream curry dehydrated eggs enchiladas fuel hiking lava cake measuring mushroom peanut butter peas pesto pot cozy recipe recipes rice sauces snow stew stove sweet potatoes tuna ultralight

Archives

  • November 2018
  • April 2018
  • March 2018
  • January 2018
  • August 2017
  • July 2017
  • October 2016
  • September 2016
  • October 2015
  • August 2015
  • July 2015
  • January 2015
  • November 2014
  • August 2014
  • June 2014
  • May 2014

Meta

  • Register
  • Log in
  • Entries feed
  • Comments feed
  • WordPress.org

Copyright © 2025 · Genesis Sample Theme on Genesis Framework · WordPress · Log in